Oh, my gosh! I had grapped the BLUE can of OFF instead of the blue can of crisco!
Tuesday, November 17, 2009
Read Your Labels
This summer I went camping with my girlfriends. We had a terrific time with plenty of laughs, food, and drinks. One morning we decided to make omelettes. The picnic table was full of snacks, beverages and miscellaneous items so I cleared off a space and starting chopping mushrooms and onions. Several of the girls joined in and helped prep veggies while I started the camp stove. Everyone was chopping, cutting, talking and laughing at the same time. I grapped the blue can of crisco, sprayed the pan, and threw in the mushrooms. A few seconds later a horrible taste was in my throut and the pan on the stove was smoking. Oh, my gosh! I had grapped the BLUE can of OFF instead of the blue can of crisco!
Oh, my gosh! I had grapped the BLUE can of OFF instead of the blue can of crisco!
Monday, July 6, 2009
Potato Chips belong in Food Pyramid
On a recent family vacation we stopped at the Cape Cod Potato Chips Company. Cape Cod potato chips are my families favorite, but with recent diet changes I have nearly eliminated potato chips and other snack foods from the pantry. So touring the plant and sampling their product was a treat.
The Cape Cod Potato Chip Company was founded in 1980 by Stephen and Lynn Bernard (thank you!) in Hyannis, MA. They now produce over 80,000 bags a day with the motto of "To make the best potato chips possible". And, as far as my family is concerned, they are the best!
Here is what we learned from our tour:
* It takes approximately 4 pounds of potatoes to make 1 pound of potato chips because a potato is mostly water. (I wonder if anyone thought of bottling the 3 pounds of water? - yuck)
* They use approximately 39 million pounds of potatoes a year. That is 1,400 acres of potatoes.(I was going to compare this to a football field but that required too much math on my part)
* They work closely with farmers from Maine to North Carolina to ensure a steady supply of higher quality potato. (did you know that in Idaho there are no potato chip manufacturers?)
* Each truck load of potatoes are sampled for specific gravity (how much water it has; less is better), sizing (grading) and raw potato defect level (not sure what this is). A sample is done to see how well the potato will "chip". After approval the potatoes are peeled with a brush peeler (not a 'potato peeler' as I would have thought), inspected, washed and precisely weighted.
* Potatoes are sliced and put directly into Cape Cod's unique kettle fryers. They are stirred to guarantee an even cook and than placed in a centrifuge where the excess oil is spun off (I told you these chips are good - no excess oil).
* The cooked chips are individually inspected by hand and salted. (images of Lucille Ball and the chocolate candy conveyor come to my mind). All discarded chips are considered organic waste and farmers use them for animal feed (yes! - recycling!)
* Most of the Cape Cod Potato Chips are "all natural" and all of the chips have NO added preservatives. The combination of fresh potatoes and the special "Kettle" cooking process produces a heartier potato flavor (could I say healthier).
 The government Food Pyramid states a 30 year old women should have 2-3 cups of any vegetable (a potato) a day. Vegetables may be raw or cooked; fresh, frozen, canned, or dried/dehydrated; and may be whole, cut-up, or mashed. After learning how Cape Cod Potato Chips are made, I really think "kettled cooked" potatoes need to move to the top of the Food Pyramid.
Tuesday, May 26, 2009
rhu⋅barb: Any of several plants of the genus Rheum,R. rhabarbarum, having long green or reddish acidic leafstalks that are edible when sweetened and cooked.
 Rhubarb is the fruit of the garden. You can barbecue it, boil it, broil it, bake it, saute it.
There are desserts and jams. There's rhubarb torte, rhubarb cheesecake, rhubarb crisp, rhubarb bread, rhubarb muffins. Pan fried, deep fried, stir-fried. There's berry rhubarb pie, lemon rhubarb bars, rhubarb soup, rhubarb salad, rhubarb chutney, rhubarb compote, rhubarb daiquiri. (Does this remind you of Bubba's shrimp mantra from Forest Gump?)

Rhubarb is a faithful and plentiful plant - it will sprout back each spring, spread and produce more rhubarb than you can use. In the spring, when the flower heads appear in the plant, snap them off to keep the rhubarb from taking over your garden. Rhubarb is a vegetable but treated more like a fruit. The stalks are tart. Do not eat the leaves as they contain a high level of toxin.
This weekend I made rhubarb muffins, rhubarb crisp and a pie.
Here is the recipe for the muffins:

Cream together 2 cups light-brown sugar and 1 stick unsalted butter. Beat in 2 eggs; add 1 1/2 cups low-fat milk and stir to combine. Add in 4 cups whole wheat flour, 3 teaspoons baking powder, 2 teaspoons baking soda and 1/2 teaspoon salt; beat until smooth. Fold in 3-4 cups rhubarb, ends trimmed and cut into 1/2" cubes. Batter will be thick.
Coat a muffin tin with cooking spray or use paper cups. Spoon mixture evenly among cups. Sprinkle each muffin with course baking sugar. Makes 2 dozen. Bake about 25 minutes in a 375 degree oven or until a toothpick inserted in the center comes out clean. Remove from oven, turn muffins onto a wire rack, cool completely.
"That's all I have to say about that."
Monday, May 18, 2009
"Please Don't Eat the Daisies"
Don't eat the daisies but try the pansies instead! Edible flowers add flavor, create a beautiful presentation, and can add a touch of elegance to any menu. Not every flower is edible and sampling some flowers can make you very sick. A Google search for "edible flowers" resulted in 502,000 websites. So, do some research before adding any flower to your recipe. I learned that English daisies are edible.
My garden has mint, violet, thyme, and lavender that comes back every spring. I am going to add nasturtiums and scarlet runner beans, and since we have an apple tree that we do not spray, I am going to experiment with apple blossoms. Never use pesticides or other chemicals on any part of any plant that is edible. You could lightly wash the flowers but shaking and checking between the petals is best for removing bugs and insects. If you don't have a garden your local supermarkets and specialty grocers will have some edible flowers and buds in stock.
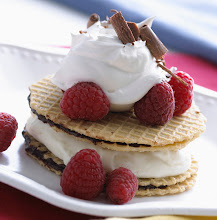
 For the Vanilla-Almond Panna Cotta recipe I garnished with snap dragons and fresh blue berries. I was the Food Stylists for
Image Studios when this photo was taken. The recipe is from "Sandra Lee Semi-Homemade Cooking 3".
Ingredients:
1 cup almond milk
1 package (1/4 ounce) unflavored gelatin
1 1/2 cups heavy cream
1/2 cup sugar
1 teaspoon vanilla extract
1/2 teaspoon almond extract
Chocolate fudge syrup, choice of edible flowers or fruit.
1. Pour 1/3 cup of almond milk into a small bowl and stir in gelatin. In a medium saucepan, stir together heavy cream, remaining almond milk, and sugar. Bring to a boil over medium heat, watching carefully as the cream will quickly rise to the top of the pan.
2. Pour gelatin and almond milk into cream mixture and stir until gelatin is completely dissolved. Add extracts and cook for 1 minute, stirring constantly. Remove from heat and pour into six 4-ounce individual ramekins. Leave ramekins uncovered at room temperature to cool. When cool, cover with plastic wrap and refrigerate for at least 4 hours and up to 8.
3. To remove, run a knife around the sides of each ramekin and invert over a serving plate. Garnish as desired.
My garden has mint, violet, thyme, and lavender that comes back every spring. I am going to add nasturtiums and scarlet runner beans, and since we have an apple tree that we do not spray, I am going to experiment with apple blossoms. Never use pesticides or other chemicals on any part of any plant that is edible. You could lightly wash the flowers but shaking and checking between the petals is best for removing bugs and insects. If you don't have a garden your local supermarkets and specialty grocers will have some edible flowers and buds in stock.
 For the Vanilla-Almond Panna Cotta recipe I garnished with snap dragons and fresh blue berries. I was the Food Stylists for
Image Studios when this photo was taken. The recipe is from "Sandra Lee Semi-Homemade Cooking 3".
Ingredients:
1 cup almond milk
1 package (1/4 ounce) unflavored gelatin
1 1/2 cups heavy cream
1/2 cup sugar
1 teaspoon vanilla extract
1/2 teaspoon almond extract
Chocolate fudge syrup, choice of edible flowers or fruit.
1. Pour 1/3 cup of almond milk into a small bowl and stir in gelatin. In a medium saucepan, stir together heavy cream, remaining almond milk, and sugar. Bring to a boil over medium heat, watching carefully as the cream will quickly rise to the top of the pan.
2. Pour gelatin and almond milk into cream mixture and stir until gelatin is completely dissolved. Add extracts and cook for 1 minute, stirring constantly. Remove from heat and pour into six 4-ounce individual ramekins. Leave ramekins uncovered at room temperature to cool. When cool, cover with plastic wrap and refrigerate for at least 4 hours and up to 8.
3. To remove, run a knife around the sides of each ramekin and invert over a serving plate. Garnish as desired.
Tuesday, May 5, 2009
Vintage Fashion Show
I am digressing from my usual "food blog" to share with you how three Image Studios employees volunteered their time and talent. Julie, Vicki and Karla volunteered to be models for the Community Clothes Closet Fundraiser - a Vintage Fashion Show. The show was held on Sunday, May 3 at the Radisson Paper Valley Hotel in Appleton, WI.
Weeks before the show each of the "models" had to try on clothes for fitting and to decide which outfits we would be willing to model. A run-through was held the week before so we could learn how to walk the run-way, practice our turns, and make last minute accessory changes.
The day of the show we arrived early to prepare and review each other's outfits. The dressing room was well organized. Hair stylists were available and each model had an assistant who would help with wardrobe changes, zipping and buttoning, and accessorizing. Each of us had 6 to 8 wardrobe changes with clothes from the 1940s to 1980s. Julie and Vicki had one "fast" wardrobe change that I was afraid they would fall off their spiked high-high heels running to the back stage!
 The Radisson Ball Room was full, the music began and the show was on. This picture is what each of us wore for our first outfit. After 2 hours of modeling, lots of laughs, and comments like "nice outfit" or "OMG" we were done. All of the clothes in the show plus racks and racks of other outfits along with accessories were for sale. The show also had a silent auction and door prizes.
We had a lot of fun and are glad we volunteered.
And, just so you know; "Talented and Experienced Models" for hire at Image Studios!
Monday, April 27, 2009
Sugar, Ahh, Honey, Honey!

"Sugar, ahh, Honey, honey. You are my candy girl, And you got me wanting you."
For the last year and a half I have seriously cut back on my sweets and treats. No sugar, no honey! No Oreo cookies, no ice cream! No candy, donuts, desserts! (o.k. I did have a small piece of the "Two Die For" cake and some Monkey Bread) I've lowered my blood sugars and cholesterol and lost weight. But for as much as I have cut back, I've discovered I still need "sugar" in my life.
On the web you can find several recipes that have eliminated, reduced or substituted sugar. Some recipes are great, others not so. The recipe in this blog has no sugar and no flour. It's not bad. It helped to modifying the original recipe to increase the cinnamon and peanut butter, and adding nuts. I did add (a small amount) of white choc. chips...... "You are my candy girl, And you got me wanting you!"
Oatmeal Peanut Butter Bars
Preheat oven to 375.
Mix together 2 cups oatmeal (instant) and 2 tsp. cinnamon.
Beat 2 eggs and 2 cups milk together. Add 2 tsp. vanilla.
In a 2 cup glass measuring cup, fill with a 1/2 cup water. Add enough peanut butter to displace the water up to 1 and 1/2 cups. Pour into egg mixture (water and pb). Whisk together. Stir into oatmeal. Pour into an 8 x 8 pan.
Bake 20 minutes at 375.
Meanwhile, melt 1/4 cup white or choc. chips in microwave until smooth. When bars are done, remove from over, drizzle with melted chips and sprinkle nuts (any choice) on top. Cool. Cut and enjoy!
Is that song stuck in your head now?
Wednesday, April 1, 2009
Too "Die-4" Cake

Over 50 years ago, while my mother was on her honeymoon, a restaurant owner gave her a cake recipe. This cake recipe has become our family favorite; "Mom, please make!" cake. It is delicious, moist, with hints of spice and a topping that is sweet and sinful. The problem is Mom will not give anyone the recipe. I told her I wasn't going to wait until she died for me to get it from her recipe box. After 25 years she has finally given in!
(i've modified the recipe to use whole wheat flour and Splenda Baking Sugar)
1. Soak 1 cup of Quaker Oatmeal oats in 1 1-2 cups boiling water. Set a side.
2. Cream together 1/2 cup softened butter, 1 cup brown sugar, 2 eggs, and 1/2 cup Splenda Baking Sugar. (use one cup regular sugar if you prefer).
3. Add oatmeal (step 1) with 1 1/2 cups whole wheat flour, 1/2 tsp. salt, 2 tsp cinnamon, 1 tsp. baking soda. Mix together with cream ingredients (step 2).
4. Pour batter into a greased 8x8 pan. (this recipe should be doubled because you'll want seconds!) Bake at 350 degrees for 35 minutes. Use the toothpick method to check for doneness about 30 minutes.
5. While batter is baking make the frosting. In a sauce pan melt together 4 tablespoons melted butter, 1/2 cup evaporated milk, and 1 cup brown sugar until sugar is dissolved. Turn off heat and add 1 cup nuts (pecan or walnut or none if you prefer), 1 cup coconut and 1 tsp. vanilla.
6. Remove cake from oven when done, spread frosting onto warm cake, and place back into oven for 5 minutes until coconuts browns slightly. Remove from oven and cool.
I told you this cake was "2-die-4"!
ps. you could add 1 cup choc. chips to the batter or 1/2 cup choc. chips in with the coconut and nuts.
Friday, February 27, 2009
Eruption of Love
Have you ever looked at a food magazine photo and said "That dessert looks yummy but I am afraid to try making it"? That has been my thought on molten or eruption cupcakes. How are these made with the chocolate that oozes but the cupcake is still baked? 
I searched online and found a few recipes. I chose one that didn't seem to complicated and had simple ingredients. I am not a big fan of coffee or coffee flavor and since I am "watching" my carb and sugar count I modified the recipe slightly. This is the best recipe I found: modified from www.eatingwell.com.
1. Preheat oven to 350°F. Generously coat a 6 muffin cupcake pan with cooking spray.
2. Place 4 oz. of chopped up semisweet ( I like semisweet but you can use bittersweet )chocolate and 2 tablespoons unsalted butter in a medium microwave-safe bowl. Microwave on High for 1 minute. Stir well and the choc. and butter should melt with just stirring. If not, nook for 10 seconds and stir until the remaining chocolate melts completely. Set aside.
3. To prepare Filling: Dissolve 2 teaspoons instant espresso into 1 tablespoon hot water. I used instant coffee that I found packaged individually. One packet was just the right amount and the other packets will keep until I make this dessert again - which will be soon.
Stir together 1/2 tablespoon granulated sugar and 1 1/2 tablespoons light cream (buy a small container of Rich's whip cream and use the remaining cream for dollops to garnish) and the espresso/coffee. Microwave on High just to steaming - 20 to 40 seconds. Stir until the sugar dissolves. Add 1 tablespoon light corn syrup and half the melted chocolate (keep the other half for the batter); stir until completely smooth. Cover and put into the freezer until cold and firm, about 30 minutes.
4. To prepare Garnish: While the filling is chilling in the freezer whip the remaining cream (Rich's) and wash strawberries or rasberries. Keep whip cream in refridgerator until serving.
5. To prepare Batter: When the filling has been chilling for 20 minutes, whisk in a medium bowl until very smooth, 1 egg, 2 tablespoons canola oil, 1 teaspoon of vanilla extract ("real vanilla" is much better than imitation), and 1/8 teaspoon salt - set aside. Microwave on Medium about 20 seconds, the remaining chocolate/espresso mixture, until just warm (do not overheat). Whisk the egg mixture into the warm chocolate/espresso until well blended.
Sift 5 tablespoons confectioners' sugar, 3 tablespoons flour (i prefer whole wheat flour) and 1 tablespoon unsweetened cocoa powder over the batter and whisk in just until smoothly incorporated.
6. To assemble Cakes: Remove the filling from the freezer. Spoon half the batter into the muffin cups, about 1 rounded teaspoon per cup. Spoon 1/2 teaspoon slightly frozen filling onto the center of each (keep the rest of the filling for the sauce). Divide the remaining batter evenly among the muffin cups. Smooth out the batter to cover the filling.
7. Bake the cup cakes on the middle rack until the edges look dry and puffed but the centers still look very underdone, 6 to 9 minutes. Remove from oven and let cool on a wire rack until firm, about 2 minutes. Place a cutting board or plate on top of the pan and invert the cup cakes out onto it. If the cakes are stuck, run a knife around them to loosen.
8. To prepare Sauce: Thoroughly stir very hot water into the reserved filling, 1 teaspoon at a time, until very smooth and slightly fluid. Serve the warm cakes drizzled with the sauce. Garnish with dollops of whip cream and fruit.
This dessert recipe, while small in portion, can be beautifully garnished and for carb counters like me, a little chocholate dessert is an "eruption of love".
Friday, January 30, 2009
Are You Ready For Some Football!
All my rowdy friends are gathering on Super Bowl night! Are you ready for some football?
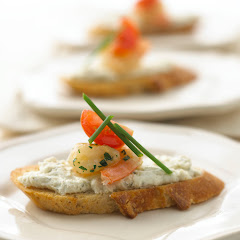
Super Bowl is coming and I am planning a menu, chiling the beer and getting my friends together. "Cold beer and a big of chips, what more do you need!" asked Bob Cashman. Well, first off, I need the Green Bay Packers to be in the Super Bowl and not the Cardinals. And, I most definitely would serve more than beer and a bag of chips! I love to make appetizers and create a buffet of snacks, desserts and drinks. Here are a few of my favorite, easy-to-make appetizers.

Combine together in a crock pot; 2 8-ounce packages of cream cheese, 1 cup chopped cashews, 1/2 cup creamy peanut butter, 2 tablespoons chili paste,
3/4 cup coconut milk,
1 tablespoon lime juice.
Cook covered on low setting for 2 hours, stirring occasionally. Serve warm or cold with cut up cucumber, celery or crackers.
- Sweet and Sour Meatballs - Ingredients and Directions:
In large bowl combine 2 pounds ground beef (you could also go lighter and use ground chicken) , 1 8-oz can of crushed pineapple, 2 tablespoons soy sauce,
1 cup fine chopped green pepper, 2 fine chopped scallions, 1/4 cup bread crumbs.
Combine together and shape into 1 inch balls. Place on a foil lined baking sheet and broil 6" from the heat for 4-5 minutes, roll over each meatball and than heat for 4-5 minutes.
1 cup fine chopped green pepper, 2 fine chopped scallions, 1/4 cup bread crumbs.
Combine together and shape into 1 inch balls. Place on a foil lined baking sheet and broil 6" from the heat for 4-5 minutes, roll over each meatball and than heat for 4-5 minutes.
Remove from rack and put into a crock pot.
In a large bowl whisk together 1 packet of sweet & sour sauce mix, 1/4 cup rice vinegar,
12 oz. pineapple juice, 1/4 cup tomato paste and 1/2 cup apricot preserves. Pour over meatballs and cook on low for 4-6 hours. Stir to coat the meatballs with sauce.
In a large bowl whisk together 1 packet of sweet & sour sauce mix, 1/4 cup rice vinegar,
12 oz. pineapple juice, 1/4 cup tomato paste and 1/2 cup apricot preserves. Pour over meatballs and cook on low for 4-6 hours. Stir to coat the meatballs with sauce.

Friday, January 16, 2009
ANYONE can be a Martha!
While checking out at the grocery store I always peruse the magazines, especially the food mags. (o.k., occasionally I pickup and read the "inquirer"). I am totally impressed by the shots of beautifully decorated cakes and think "I wish I could be like Martha and do that". Well, let me tell you, I can, and if I can, you can!
I am not a fantastic cook. In fact, I seldom cook. But when I have an occasion or friends and family over, I really want to make them feel special. So, I took a class on cake decorating and learned how to use fondant and make gum paste flowers. Here is what I learned.
Working with fondant and gum paste is like playing with play-doh. Remember those colorful but smelly containers and all the shapes you could make by pushing down on the lever of the play-doh machine? I'd make and decorate pretend cakes which I could never eat. Fondant and gum paste doesn't taste much better than play-doh. But the beautiful shapes and flowers you can make will impress everyone.
1) Purchase either powdered mix or ready mixed gum paste (hobby lobby or michael's and don't forget to go online and print out a coupon).
2) Mix desired amount per instructions. Knead gum paste until it's soft and pliable. If it becomes sticky knead in a bit more mix. If it sticks to your hands rub vegetable shortening onto your hands.
3) Rub a bit of vegetable shortening onto your work surface. Keep the surface and your hands clean of fuzz and stuff because the gum paste will pick up everything. Roll out gum paste using a rolling pin just like you would a pie crust. Add veg. shortening to rolling pin if it sticks. Roll out to about 1/6 thickness. Cover tightly in plastic wrap the gum paste you are not using. Cut out shapes. I used a petal leaf shape to create my flowers.
4) Create a ring of foil and set a side. Start with one petal leaf shape and pinch between your fingers to give it shape. Lay petal leaf inside foil ring, hanging over the side. Continue pinching and shaping petals and place in a circular shape within the foil ring. You may want to alternate and make layers to create a flower look. (it will help to look at photos of flowers before you start).
 5) You can add food coloring to the gum paste to create different colors. Add a few drops and knead paste until the color is well mixed. Remember to keep unused gum paste covered in plastic.
6) You can use a toothpick to create lines and details.
7) Continue forming and shaping gum paste - just like play-doh! 8) Leave your creations sit until dry. If something breaks; mix a small bit of gum paste with water until it forms a runny paste like glue. Glue pieces together using a fine brush.
9) When flowers or shapes are dried use to decorate your cake or cupcakess. Keep unused in airtight container.
See, you can be a Martha also! (don't worry if your gum paste flowers look like aliens, you can always sell the photos to the inquirer!)
I am not a fantastic cook. In fact, I seldom cook. But when I have an occasion or friends and family over, I really want to make them feel special. So, I took a class on cake decorating and learned how to use fondant and make gum paste flowers. Here is what I learned.
Working with fondant and gum paste is like playing with play-doh. Remember those colorful but smelly containers and all the shapes you could make by pushing down on the lever of the play-doh machine? I'd make and decorate pretend cakes which I could never eat. Fondant and gum paste doesn't taste much better than play-doh. But the beautiful shapes and flowers you can make will impress everyone.
1) Purchase either powdered mix or ready mixed gum paste (hobby lobby or michael's and don't forget to go online and print out a coupon).
2) Mix desired amount per instructions. Knead gum paste until it's soft and pliable. If it becomes sticky knead in a bit more mix. If it sticks to your hands rub vegetable shortening onto your hands.
3) Rub a bit of vegetable shortening onto your work surface. Keep the surface and your hands clean of fuzz and stuff because the gum paste will pick up everything. Roll out gum paste using a rolling pin just like you would a pie crust. Add veg. shortening to rolling pin if it sticks. Roll out to about 1/6 thickness. Cover tightly in plastic wrap the gum paste you are not using. Cut out shapes.
 I used a petal leaf shape to create my flowers.
4) Create a ring of foil and set a side. Start with one petal leaf shape and pinch between your fingers to give it shape. Lay petal leaf inside foil ring, hanging over the side. Continue pinching and shaping petals and place in a circular shape within the foil ring.
 You may want to alternate and make layers to create a flower look. (it will help to look at photos of flowers before you start).
 5) You can add food coloring to the gum paste to create different colors. Add a few drops and knead paste until the color is well mixed. Remember to keep unused gum paste covered in plastic.
6) You can use a toothpick to create lines and details.

7) Continue forming and shaping gum paste - just like play-doh! 8) Leave your creations sit until dry. If something breaks; mix a small bit of gum paste with water until it forms a runny paste like glue. Glue pieces together using a fine brush.

9) When flowers or shapes are dried use to decorate your cake or cupcakess. Keep unused in airtight container.
See, you can be a Martha also! (don't worry if your gum paste flowers look like aliens, you can always sell the photos to the inquirer!)
Tuesday, January 6, 2009
Monkey Bread
One of my favorite foods to make is Monkey Bread. Monkey Bread is a classic and one I am sure most of you have made, ate, or at least heard of. It is a favorite of mine because my family requests it for Christmas morning and served gewy and hot while we open presents. Monkey Bread is now a family tradition. This year the tradition had a bit of a "bug". Flu bug that is! Yes, I was unfortunate and caught the bug Christmas Eve. I'll spare you the details. I was fortunate enough to have pre made the monkey bread before I got sick. Christmas morning my daughter, Emily, put the monkey bread in the oven and set the timer. They all gathered in the livingroom where my husband had built a warm-cozy fire in the fireplace and put holiday music on the CD player. My family laid a sheet on the sofa, brought my pillows, blanket, and just-in-case-i-don't-make-it-to-the-bathroom bucket, and settled me on the sofa. We began to open Christmas stockings as the wonderful smell of Monkey Bread filled the room.
 Toss pieces, a few at a time, into a bowl of 1 cup sugar and 2 tbls. cinnamon.
 Place all sugar coated pieces (3 tubes) into a sprayed bundt pan or angle food pan (place a jelly roll pan under the angle food pan in case of drips). Melt one stick of butter in microwave. Add one cup of brown sugar to butter. Pour over top of pieces.

The timer went off and Emily pulled the bread from the oven, put a plate on top, flipped it over, and let the gewy-melted brown sugar run down
the sides. Yum, Yum!
My family grabbed plates and forks and pulled apart the "just baked right" Monkey Bread. If my mouth could have watered it would have. If my stomach could have tolerated it I would have more than eaten my share. But no. As I watching the faces of my happy, content family devouring the Monkey Bread, I made a quick dash for the bathroom!
RECIPE: It's So Easy Monkey Bread
3 containers/tubes of buttermilk bisquits.
Divide each bisquit into three pieces.
Toss pieces, a few at a time, into a bowl of 1 cup sugar and 2 tbls. cinnamon. Place all sugar coated pieces (3 tubes) into a sprayed bundt pan or angle food pan (place a jelly roll pan under the angle food pan in case of drips). Melt one stick of butter in microwave. Add one cup of brown sugar to butter. Pour over top of pieces. Bake in 350 degree preheated oven for no more than 30 minutes.
Remove from oven. Place a plate on top of pan and flip over. Left off pan. Serve, eat and enjoy!!!
Subscribe to:
Posts (Atom)